Bibliography:
Internet Sites:
https://www.facebook.com/weavingwithveranoahetet/
http://www.warpaths2peacepipes.com/native-american-culture/meaning-of-feathers.htm
http://beadage.net/gemstones/
http://www.indians.org/articles/feathers.html
http://www.history-nz.org/maori.html
https://en.wikipedia.org/wiki/Native_Hawaiians
http://www.sharedwisdom.com/product/bowl-light-ancestral-wisdom-hawaiian-shaman
http://www.coventina.net/chaman-maya.php
http://www.yucatanadventure.com.mx/mayanrituals.htm
Wednesday, 27 April 2016
Thursday, 21 April 2016


Thursday, 14 April 2016
Making the headress.

So as my main accessory I chose to make my own headdress as I knew I wouldn't be able to buy what I wanted from anywhere. I had been looking through many images over the past few weeks and finally got an Idea of the shape and structure that I wanted. I also had it clear that I wanted it to be white in colour and a strong structure with regards to the feathers, mixed with soft structure.
After drawing up my design Ideas and how to make it, I took a trip to Hobby craft to see what I could find. I bought a plain white headband, different sized and textured feathers, gold beads, a glue gun and some glue sticks.
Method:


Method:

- I cut a piece of cardboard into a round shape, with a lip to attach to the back of the headdress. This would support the feathers and allow me to attach them to something.
- Once this was attached I grouped together my string on feathers and arranged them on the cardboard. Once I was happy with the arrangement, I glued them in place.

- I then layered about 10 fluffy white feathers on top of these to create a different texture.
- I then layered some shorter, harder white feathers to these to clean up the front and make sure it looked neat and symmetrical.
- i then individually attached single golden beads to the head band piece to add a different texture and colour to the headdress and make it pop.
- I then had some beads left over so I attached these to the front feathers to create a little extra sparkle and blend the beads in.

Birds: Messenger of the Gods

Different Birds and there feathers represent different things. To the indigenous people they represent the link between the physical/nature world and the spirit world. They believe that because they can fly, they are our only connection to the spirit world and they hold the power to fly between both planes and deliver messages to and from us.
There symbolism doesn't just stop with indigenous people though. They are significant with many different religions, cultures, and beliefs of people all over the world.
Growing up my mum was very spiritual and still is. She is one of the most intelligent people I know and is creatively gifted in many areas. She is a natural researcher so has spent her entire life absorbing knowledge. I always look to her for advice, guidance and knowledge and she always seems to have the answer, or at least can point me in the right direction. She taught me about what birds mean to
Photo References:
Top left photo-https://uk.pinterest.com/pin/371265563012250700/
Top right-https://uk.pinterest.com/pin/122512052339792689/
Bottom Right-https://uk.pinterest.com/pin/371265563012250620/
Bottom Left-https://uk.pinterest.com/pin/190488259212831158/
Reference: http://www.warpaths2peacepipes.com/native-american-culture/meaning-of-feathers.htm
Frequency Seperation.

So we had learned about Frequency Separation in one of Peter's class's. I found it quite a complicated process to just pick up on my first go, So I decided to go home and have a look for an online YouTube tutorial for this so I can practise it in my own time.
Frequency Seperation is a new innovative technique within Photoshop that allows you to clean up the skin quality without jeopardising the texture of the skin. I felt that this was really useful with this project as I had recently learned about the airbrushing tool and the patch tool in Photoshop, and found them to leave the image looking cartoon like. I wanted something that still made the skin look like skin when you zoomed in but that got rid of the discolouration and lumps and bumps.
I did have to do this step by step tutorial a few times before I started to recognise what I was doing but I'm proud of my progress as this isn't a skill that comes easily. This has sparked an interest with me, as I feel that this tool completely transforms the image and makes it look a lot more professional. This has definitely inspired me to keep going with regards to learning the different tools on Photoshop and see what all of the tools are capable of.
I have included the link below so that you can see what I used.
Here's the link to the tutorial I used: https://www.youtube.com/watch?v=ldhG9fmgC7o

Photo Call Sheet for Final Editorial Shoot

This is my photo call sheet for my final Editorial Shoot that took place on the 23rd of March at 10am.
Wednesday, 13 April 2016
Photo Call sheet: For Test shoot

This is the call sheet for my practise shoot with Annie for my editorial image.
Earth Stones and their Pastiche History
 |
| http://www.sofia-albertsson.se/wp-content/uploads/2014/06/tumblr_m7unmxjKfX1rvyb70o1_.jpg |
Earth stones have, much like their surface, a multi faceted History. Sourced straight from the earth, they have been used for many things. Jewellery being the most popular. Precious stones have been mined for hundreds of years and used as a currency. 13 Billion are mined each year and their individual worth can be anywhere from thousands to millions of pounds. Semi precious stones are easier to come by and still just as beautiful. They are more easily found and are used for jewellery (eg Turquoise, amethyst, Ruby, Sappire), ornaments (Crystal), Costume.
 |
| http://blog.freepeople.com/2012/10/free-people-horoscopes-25/ |
Other stones are famed and used in Architecture, Different Types of Marble, granite, limestone just a few examples. Stones are used everywhere and with indigenous people they were used for cook ware, pots, bowls, weaponry. I want to focus on the use of them in their costumes. They would wear a lot of jewellery for ceremonies and this made me also think of India and the ceremonial wear they wear. For brides on their wedding day they wear very elaborate decorative jewellery and I think they look so beautiful. They are always brightly coloured and Bold. I want to see if I can get some jewellery for my shoot as a way of incorporating this. I think it will look so beautiful with the feathers Im including.
 |
| http://www.designsnext.com/wp-content/uploads/2014/02/indian-wedding-jewelry-3.jpg |
Location shoot for Makeup in motion project.

So as I have said all along in this project, I have really enjoyed learning different Techniques within photography and I have really enjoyed the studio work I have done and the different effects you can create with the lighting. I really wanted to experience a location shoot and see how it is when you have to play with lighting that you cant control the power of. For my makeup in motion project I decided to write a short story to accompany my character designs. We also had to shoot the makeup we had done and one of the options was to either do the shoot at home, or in uni. I decided this was a great opportunity to try a location shoot. I had planned this for the easter holidays and had a look at the weather forecast for what looked like the brightest (and driest) day weather wise. This would help me with regards to lighting as I wanted to play with natural light and not have to rely on taking out location lighting.
Luckily The day I chose to shoot was a dry day and very bright so all I had to worry about was Aperture and the natural shadows, positioning, and props. I was very aware that I had to make sure the images were not overexposed, because of the direct sunlight. I also had to think about the makeup and the fact I might lose it in the images. So I had to make sure I touched up the makeup and went in a little deeper so that the camera would pick it up.
It felt really free working outside with nature and I could feel myself feeling more excited and passionate about the shoot. Natural light is so beautiful and if you know enough about it and how it changes with the weather and the time of the day, you can really manipulate it and use it to your advantage.
I was really lucky with my models as they were really willing to get themselves dirty for the sake of the shoot. In Winchester their is a place called the Winnall Moors. Its a random but beautiful marsh land area with weeping willows and trees emerged in the water. Their are hidden lakes and expansive reeds. The landscape is so diverse that I felt it was perfect for my photographic Location. My sister who was my model again jumped across water to climb this tree! I wanted her to almost become an extension of not just the tree, but nature itself. She tried some different poses, but this one was my favourite and she looked so beautiful! I also found a small lake in the marshes and wanted to set the scene for 'The meet' between my two characters. I love the way the lighting hits both of my models and I think because of their natural chemistry, you can really see the connection between the two.
I am really pleased with how these came out. Midway through the shoot my battery went and I didn't have a spare battery. I was lucky that the ones I took turned out really well, otherwise the hours I put into the makeup and hair for both models and the shoot prep, including the drive to the location would have all been a a waste. I have learned so much this semester about preparation and planning and how important it is. The one thing you don't want to do is waste the models time and ask them to come in a second time for a re-shoot. Every mistake Ive made I have written down and is something I now consider when planning a shoot. I'm constantly growing and proving myself to myself time and time again. I do feel that I have had a couple of break throughs this semester.


Feathers: With the Mayans
 |
| http://dndon.info/wp-content/uploads/2015/12/modern-style-ancient-mayan-art-and-ancient-mayan-priests-maya-money-marketers-see-23.jpg |
Apart from having a lot of spiritual significance featherwork to the mayans was a creative outlet. They featured in a lot of what they created including, clothing, accessories, capes, Headdresses, Loincloths, Armbands, Backracks, Sheilds, Ornaments, Artworks.
Feathers were a sign of wealth with the Mesoamerican people and Kings and Gods in Artworks wore a lot of very elaborate feather inspired costumes. One of the main reasons Feathers were so sacred to these people was the vivid colours and patterns of the feathers they used.
They collected feathers from all over south America and would also trade with them to create currency for their tribes.
Feathers were of prominent use in dance and war for these people.
Feather they collected could be from ordinary birds like duck or the turkey but to the most precious were from colourful, tropical birds like Cotinga, Macaw, Parrot, Humming Bird, Oropendula, Emerald Toucanet, and the Troupial bird.
I love the Mayan People's use of the feather but I also love their use of Jewellery and Body art. Their costume were probably the most elaborate and decorative of all indigenous tribes and I was definitely inspired reading up on them. I love the shape of their Headdresses and I think I want to use this shape for my final design as you can really see the feathers and think this will look great in my final image.
They used colours that were very bright but I want to use white as this is ethereal and more symbolical of spirituality to me. The images of angels I saw growing up had white angel wings so I want to combine these ideas, to make the design more personal to me.
Feathers: With the Native Americans
 |
| http://xpatnation.com/wp-content/uploads/2015/08/Native-American-A23502.jpg |
Like all indigenous tribes Feathers hold a great significance with the native American people. Their belief system is based around the idea that all of nature including the earth and the earths animals, are connected to spirit and the spirit world. They believe that we were all created to be connected spiritually, and all things in nature have purpose, wisdom and power.
They believe that when one wears a material from an animal, this will connect them to spirit and the animal it came from. All things that are found from nature are thought to be gifts from god and they honour these gifts greatly.
Feathers in particular were given to warriors after every great battle. They would be added to the warriors headdress and Headdresses would be a map of their battles and life.
Ive always had a great appreciation and interest for native American history and culture. They live their lives connected to nature and the earth and I believe they had and still have a very powerful message. I have definitely been inspired with this research and this has only allowed me to develop my design ideas further. I have looked at a couple of different tribes Headdress style, as every tribe would have a different style, and seen how I can incorporate this into my design. I want to make a very contemporary interpretation and need it to be a shape that is visible in my shoot.
Tuesday, 5 April 2016
Lighting Inspiration and how to achieve my desired lighting.

The first picture on the top left position was the first time I knew what lighting I wanted. I just thought it was so beautiful. The model skin is so crisp and porcelain, but yet the lighting is so bright. The last semester I used very bright lighting and Chris mentioned that they were over exposed and almost faded out the skin quality of my model. When I looked at my last pictures through his eyes I understood what he meant. So with this project I really wanted to get that part right. It is essential to me that the skin quality is perfect. I want to illuminate the skin with out washing out my model. I want you to be able to see the skin and makeup clearly.
I did some research into this lighting. I also asked Chris his opinion, to see what kind of set up I would need to accomplish this. I found that in order to make this bright daylight looking light I would need to make a light box. I will make this from the white reflector boards, The white light diffuser over my model and a white board/reflector in front of my model. I also want to use a white background. The light needs to be able to bounce off of every white surface and this will create the white lighting I want.
I will do 2 test shoots to make sure the lighting works for my shoot as this lighting set up is quite complicated and I want to make sure I'm really prepared. I also feel that this is great studio experience and will help me with the technical aspect as I learn and hold onto more information when I'm physically practising the practical side.
Here is the lighting set up I want to use for my editorial shoot.


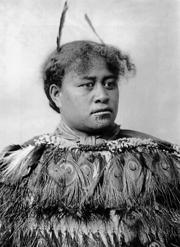
Feathers: with the moari's
 |
| http://news.tangatawhenua.com/wp-content/uploads/2011/05/korowai.jpg |
 |
| https://s-media-cache-ak0.pinimg.com/236x/78/a6/42/78a642eae85c3671aef2bd68e850de96.jpg |
Maori Cloaks and Traditions.
When the Maori ancestors arrived in New Zealand from the eastern pacific nearly 900 years ago, they brought with them there weaving skills and techniques. Usually using the Raranga plaiting technique for baskets and mats they used it to make warmer clothes as the weather was a lot colder. They Experimented with materials like feathers and animal skins.
When the Europeans arrived in the 1800's they experimented with the materials they brought with them like wool and exotic feathers and thats how they have come to look like they do.
Maori Shamanism and the cloak.
 |
| Add caption |
Modern Art
My mum found an artist online called Verenoa Hetet, who has transformed the classic Moari cloak into contemporary art. She did this so that the traditions of her people can reach a wider demographic, so that the traditions of her ancestors wouldn't be lost in history. A lot of Maori people are starting to bring the tradition back as it was lost for a long time. She used the classic materials her ancestors would use like feathers and shells.
These pieces are a modern representation and each one holds a message. I love the contemporary interpretation and the materials she had used. She has turned them into art and shared a sacred part of her history with her followers. I think that they are beautiful. The way the colours and natural patterns of the materials used blend together and work together, reminds me how nature works together.
Styling Ideas and Inspiration for my Editorial shoot
 |
| https://uk.pinterest.com/pin/558868634986063260/ |
When deciding on the outfit for my editorial shoot, I new I wanted a headdress and feather bralet before the skirt idea. When I think of the crop top and midi skirt, my first thought is Carrie Bradshaw's red skirt/top birthday combo, from season 4. This one of my favourite outfit's from the series and must be ingrained in my memory from years of watching the series over and over again. I love the fun and flirty look of this outfit.
I found the material in my mums vast collection of fabrics and asked my mum to make me a mock up for the shoot. Luckily she said yes and I ended up with a beautiful midi 50's style skirt that went beautifully with the feather bralet and headdress I made! I am really pleased the way this all came together and cant wait to shoot with it.
 |
| https://uk.pinterest.com/pin/303007881158491130/ |
My final brand shoot.

Today I had my Brand shoot. I asked my sister to model for me as I thought she was a good fit for the brand. I went in early to make sure I had enough time for hair and makeup. I wanted to do my second design idea, and style my model in a modern 40's look. I wanted to pay homage to No7's long life and give it a modern twist, using modern makeup application and products. I'm really happy with the way the makeup came out. She looks flawless and I'm really happy with the way my model, the make up, and the hair came out in the studio.
 |
| my studio set up. |
Above is the studio set up I used. I kept my camera settings the same as previous studio sessions but played with the light settings and aperture if needed.
- I set the camera up about a metre away from this from the set up.
- The computer was next to me and connected to my camera with the tether cable. so that I could change the settings and see what I was doing.
- I used a 50mm lens, SD Card, Hot shoe adaptor.
- Camera setting were: Manual, Daylight, Raw camera image, ISO 100, Aperture 1/160.
- I altered the aperture if needed to create the brightness I was after but only after changing the light settings either by, turning the power up or down on the over light.
- I used to black poly boards to keep the light on my model. This also helped keep the surroundings of my model blacked out.
- I used The spotlight fixture to create the spotlight effect.
I had to play with the positioning of the light as this was my only light source and wanted to make sure it was flattering and creating shadows in the right place on my model. When I had a good position for the light I could then begin shooting. I am really pleased with the outcome of the photos. I have so many good shots of my model that I know the next challenge is editing them and choosing my favourite and the photo that I feel is the most appropriate for my brand.


Studio practise and being creative

This semester I found the technical and editing side of digital image production really challenging. I was asking Chris for assistance when shooting, a lot, so I decided to dedicate some time to extra shoots, to really learn about, lighting, settings on the camera, and problem solving. I love photography and found I have a real passion and love for it. I found that when I'm just being creative and doing spontaneous shoots, I'm a lot more relaxed and able to solve issues. I'm able to do this with little to no stress. I found that I know a lot more than I thought and that if I use my spare time to experiment I will feel more comfortable in more pressured situations.
I was looking through Instagram and found some really beautiful images. The makeup was based around colour, glitter, and highlighting. I really wanted to just go into the studio and be spontaneous and creative and see what the outcome was. The only thing I planned was the hair. I wanted to donut buns either side and have them glittery. I also used some of my diamond hair accessories I used from last semester to put into the buns to give them a little extra sparkle. I then fit my makeup around this.
I also used some pink glitter fabric and wrapped it around my sister to create a top. I then accessorised this with some bright coloured diamond earrings. I wanted this look to be bright and beautiful with a quirky twist to make it modern.
Photography settings
Below is the studio set up I used. I kept my camera settings the same as previous studio sessions but played with the light settings and aperture if needed. I used the same settings as my brand shoot. I love the effect of the spotlight so I wanted to use this as I feel its a great way of focusing on the makeup.
- I set the camera up about a metre away from this from the set up.
- The computer was next to me and connected to my camera with the tether cable. so that I could change the settings and see what I was doing.
- I used a 50mm lens, SD Card, Hot shoe adaptor.
- Camera setting were: Manual, Daylight, Raw camera image, ISO 100, Aperture 1/160.
- I altered the aperture if needed to create the brightness I was after but only after changing the light settings either by, turning the power up or down on the over light.
- I used to black poly boards to keep the light on my model. This also helped keep the surroundings of my model blacked out.
- I used The spotlight fixture to create the spotlight effect.
- I also played with the gels, pink, purple, and red.


Wednesday, 30 March 2016
Practise for my Brand Shoot.

For my Brand shoot I was playing with a few Ideas. My first Design Idea is to have a natural look on my model Bizzee. No7's current and most recent campaigns have all been about natural beauty and and bringing out the natural beauty in every woman. This Idea I loved so I chose my sister to model for me as she is 29. No7 always look for models that are above 25 so I thought my sister would be perfect. Not to mention the fact that she is beautiful and has amazing bone structure.
I moisturised her face first with Embryolisse moisturiser. This moisturiser is great for all skin types and really hydrates the skin and prepares it for makeup application. I also used my Bobbi Brown vitamin enriched face base as this is great for mattifying oily skin. I then applied mac foundation, a mix between NW13 studio fix foundation and Mac face and body N4. This matched perfectly with her skin tone. I then used Nars Concealer in vanilla under the eye and around any areas that were dark or red. I then set this with translucent powder. I then contoured slightly for a natural look with Benefit Hoola bronzer. I also used my blusher palette from Coastal Scents to add a bit of natural looking pink to the cheeks. I then shaped and filled in the eyebrows and added a mauve colour to the eyelids. Creating shadow in the outer corners and crease. I added a bit of mascara for a soft full look keeping it very natural. I then added a dusty rose pink to my sisters lips lining them with the matching liner.

I have included the before and after to see the outcome. I love this look on my sister as I think this really suits her and I feel like this would fit with the No7 brand message. However I want the final look to be a bit more powerful so I'm going to experiment a bit more to see what I can create.
lesson 3 with Chris Overend: Spotlight and Gels

Today in Chris's class we learned how to use spotlight lighting in photoshoots and we also experimented with gels and stencils (Go Bo's) that slotted into the spotlight attachment. Theses would create different effects and shapes in the photograph as you can see in the above images. There were many different ones but we chose the jungle leaf one and also a tree like effect one. I loved how these completely transformed the photo. You could really use these to create the feeling of being some where else. This combined with an exotic makeup design could be really effective.
We placed the boom with the spotlight attached to the light on the boom. We placed it so that the spotlight was about a metre away, hovering over the model and faced the model. This meant that because the spotlight was positioned a bit away from the model, the light stretched and covered more space. The boom light was attached with a sync lead to the camera. The cell switch on the overhead light was switched on. The camera was spaced a metre away from the model.

We also put 2 black boards either side of the model to keep the light in this space. This was also really useful when using the gels, as seen below. We also put a light with a small beauty dish attached behind our model, almost in view to create flare, whilst using the gels. This gave the feeling of being in a club or party, with bright lights and colours everywhere. I love this look. Chris also breathed into the lens, Which made a huge flair. This looked really cool and showed that if you play with equipment and use it in different ways you can make some really cool effects in photography.

For the image below we just used the spotlight without the back light. We put the 2 boards closer to the model. This trapped the light and made it brighter and more focused on the models face! This is a great one for makeup advertising, as the skin quality is bright and crisp and luminous.

I really enjoyed this lesson and feel like I learned a lot. I really want to experiment and push the envelope when it comes to shooting my editorial shoot. I want to challenge myself with something I haven't done before and hopefully the end result will be worth it.
Monday, 28 March 2016
Test shoot for Editorial Pastiche shoot.

So today I had my test shoot. It was important that I tested the makeup, costume, lighting and camera settings to get the exact image I wanted. I had spoken to Chris a month previously about what kind of lighting I wanted and I showed him the photo thats included in my previous design posts. He talked me through what I needed to do. This included creating a light box that creates almost natural day light. Surrounding my model with light. After speaking with Chris I decided to give this a try in my test shoot.

- I began with pulling down the white back ground and Putting up the poles to the ceiling.
- I then attached the brackets to the poles and attached the large rectangular light reflector.
- I then put 2 large reflective boards either side of this.
- This was all placed next to the back wall to create a light cove.
- I had a tall light over the light reflector with a beauty dish fitted. This was the light source. This light would then reflect off of all of the light reflectors and boards. This was connected by the sync lead (connecting the light flash to the camera).
- I set the camera up about a metre away from this.
- The computer was next to me and connected to my camera with the tether cable. so that I could change the settings and see what I was doing.
- I used a 50mm lens, SD Card, Hot shoe adaptor.
- Camera setting were: Manual, Daylight, Raw camera image, ISO 100, Aperture 1/160.
- I altered the aperture if needed to create the brightness I was after but only after changing the light settings either by, turning the power up or down on the over light.

Outcome and thoughts:
I'm really impressed with how this came out. I love the skin quality and how the white feathers softly blend with the back ground. Its soft and angelic which I love. I will have to see if I can create some contrast between the headdress and the background as this is an important aspect of this shoot. I'm also really pleased with the way the skirt, bra-let and headdress came out. They go so beautifully with the jewellery and I really feel you can really see my design ideas and how they have developed. I'm really excited to see how this shoot comes out and I really feel that this will be a strong photograph to go into my Portfolio. This project has really inspired me to design some new shoots and develop my technical skills in photography.

Test shoot 2
I came in this morning on a Sunday to do a test shoot with my model Annie and to help assist with her shoot afterwards. I was in a much smaller studio this time so this did affect the lighting set up and also how to photo's came out. I had spoken to Peter O'keefe about my lighting and I showed him my test shoot photo's and he said that I could experiment with the lighting by adding more to light up the white background. This would make the headdress stand out more and create a separation between the white back ground and headdress. So I decided to try this Idea. I didn't make up my model for this test shoot as it was a quick lighting experiment so I just used the time to play with the lighting.

I created the same lighting structure but I moved it further away from the background and added some soft boxes facing the background. This was a very small space so It didn't quite work the way it was supposed to but It was a very good experiment and I could see how it would work in a bigger studio. I used the same camera settings as I did in the previous test shoot as I had recorded them to use in these shoots.

As you can see from the top row of photos I had to adjust the lighting to get it just right. I adjust the power of the flash first and then adjusted the aperture on the camera if needed.
I love how porcelain and crisp the skin quality is in this light and how you can see everything. The lighting is highlighting different parts of her body and I love the contrast between Annie and the background. This lighting is something I will use in the future for more shoots as I loved the outcome. However I will know for the next time that I will need a bigger studio as this was too small for this large scale set up. I do also want to try this for my final shoot shoot to see how this comes out.
Final Shoot for Editorial
Today was the day of my final shoot and I had booked the studio from 10-2. I had arrived at 8.30 to set up my makeup in the beauty area. My model Annie arrived at 9 and I began to apply her makeup and style her hair for the shoot. Once I had prepped Annie for the shoot, I then started to set up the studio as the previous people had now left. I had a few problems with the set up, as it was a very busy morning in the studios and there was a lack of equipment. I asked Chris for advice and he advised me to be creative. I really appreciated this as this happens a lot in the industry. Sometimes equipment is forgotten or theres a problem and you have to think on your feet and come up with a new way of getting the same result. Chris talked me through building a structure to use instead of the boom. I then began to build my lighting set up.
For my final shoot I wanted the lighting to be very light but still crisp enough to see all of my models features and my design detail. I built a light box so that the flash lighting would bounce off every direction. I used The poles and put them in place to hold the light reflector board above my model, using brackets. I tilted this. I then put up 2 white foam boards either side of this structure to keep the light in, and used a white back ground. I also used a foam board to close in the structure. I tilted this and this helped keep the light on my model and fill my images with even light.
 |
| http://www.lightingdiagrams.com/Creator |
Below I have added a picture that shows my camera settings. I adjusted the flash power on my overhead light on the boom, if the image was too bright or too dark. I also played with the aperture on the camera settings to get the perfect light balance and the colouration I wanted for my image.

Once I had the right lighting I postitioned my model and began shooting. I played around a lot with the composition and made sure I had a lot of close up's, For this I used a 50mm lens. I also took some full length images, with my model sitting on the ground and also some half body shots. I wanted to make sure I had a lot of variety to choose from and this was also really good for experimenting with different compositions and making sure the lighting was adjusted accordingly.
Outcome and Thoughts:
I definitely found this shoot challenging and I learned a lot about the setup and structure of a shoot. Photography is all about taking risks and experimenting and I find letting go very challenging sometimes. It can be very pressured shooting within tight time frames and managing the set up, the makeup and hair, styling, lighting, photography, and editing all by yourself. This shoot was really important to me as I fell in love with my design idea and really had a specific outcome in mind when I was shooting. I can be quite a slow learner and I can find it hard to hold on to lots of information (especially technical), so this was really hard for me and I did feel like giving up a few times. I'm very glad I pushed through and achieved this outcome. I definitely want to make a concerted effort to be more patient with myself and approach photography in a more open way. I really enjoyed the whole design aspect and feel that I achieved a high end look for my final editorial photographs. I really feel that my final design reflects my research and design development with my chosen word and I am really pleased with how it all came together and definitely feel that my hard work paid off.
I have picked a few of my favourites, unedited as a sneak peak.

Subscribe to:
Posts (Atom)